Thursday, 8 September 2011

Beautiful Bergamot

I love earl Grey tea, and I can fully understand why Captain Picard drinks so much of it.

So, I decided to mix two of my favourite things and make some Earl Grey Tea cakes.  

I did find a lot of recipes, online, but even the vegan ones had to be modified for people who have sensitivities to wheat and soy (like myself), so this recipe was always going to be a little experimental with new substitutes for original substitutes.

However, even with the tweaking, they turned out great. The texture was light and just moist enough, and the bergamot was nicely balanced with the citrus flavours.

And here's how to make them....


Wet Ingredients
1 cup of rice milk
6 to 8 Earl Grey teabags  (I used two Rooibos Earl Grey made by Dragonfly and four Sainsbury's taste The Difference decaffeinated - I would suggest staying away from cheaper brands as the tannins get released very quickly, leading to a rather bitter taste.)
1/4 cup of flavourless oil (I used sunflower)
1 pot of plain 'Wot No Dairy' dessert by Redwood Foods (this is a substitute for the soy yogurt; if you can eat soy you can use that instead.)
3/4 cup of granulated sugar
1 teaspoon of vanilla essence
1 teaspoon of orange essence
1 1/2 teaspoons of lemon juice
Dry Ingredients
2 cups rice flour
1/2 teaspoon baking soda 
1/2 teaspoon baking powder
1 teaspoon of ground flax seeds.

Method
Heat the rice milk, on the stove or in a microwave, until it gets close to boiling point.  Add the teabags, cover and remove from the heat.  The tea will have to brew for about ten minutes, so this is the perfect time to pre-heat the oven to 250 degrees or gas mark 6.

Once the tea has brewed, give the bags a good squeeze in order to ensure that you're getting as much flavour from the tea as possible.  Now all the wet ingredients can be mixed together.  

The yogurt substitute will make the mixture a bit lumpy so try to get everything as smooth as possible, at this point, in order to make mixing the dry ingredients easier.

Add the flour gradually, stirring constantly.  Add the rest of the dry ingredients and mix thoroughly.

The yield of this mixture was about eighteen cupcakes, or one, average, 9 x 9 cake.  Be sure to grease whatever implement you're pouring the mixture into, including paper cases, if you're using them, as the cakes can be quite sticky once baked.  The cakes rise quite well, so it's best not to fill the cases to the top.

Bake for about 20 minutes, or until they pass the 'toothpick test'. If possible, allow the cakes to 'rest' overnight as this really enhances the final flavour.

Enjoy!

    Sunday, 4 September 2011

    Another Easy Top


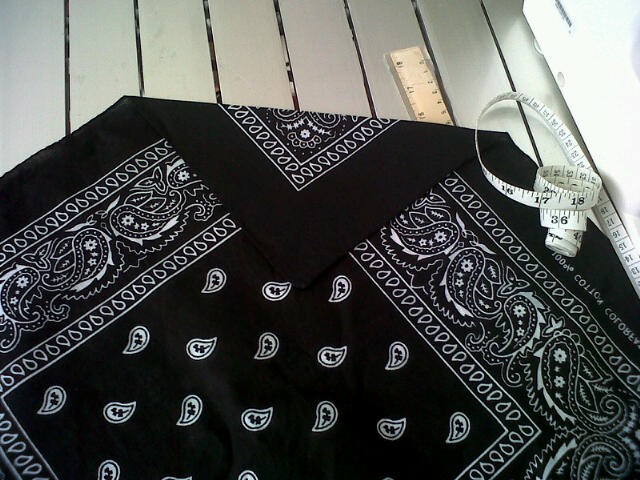
    This is perhaps the easiest top in the world to make.  All you need is a bandana and three pieces of ribbon (or jersey, or decretive cord).  I made a bundle of these in various colours to wear over the summer (which, unfortunately, didn't really materialise in the UK), but they can also be worn over a spaghetti top if you want to add an extra layer.


    You will need:

    One bandana
    matching thread
    Three pieces of 'cord' - one long enough to fit comfortably around your neck and one for each side, long enough to cross over the front of your body (mine worked out to be about 26 inches each).

    We begin by folding down one corner of the bandana.  Pin this in place and press along the fold.


    Leave enough space along the folded edge to insert the drawstring and stitch along the pinned line.


    Now we are going to attach the ties to the sides.  I decided to use jersey as I always have scraps of T-Shirts left over from other projects.  Pin the ties to the wrong side of the bandana and stitch.  Tie the exposed end of the 'cord' in a simple knot to prevent fraying.


    Take the last piece of 'cord', attach a pin to the end and feed it through the channel created at the top of the bandana.  Knot the exposed ends as before and you're done!


    Thursday, 1 September 2011

    Accidental Vegan Trifle


    BAKING DISASTER!!!!


    I've been battling a rather annoying head cold (probably brought about by sitting in near arctic conditions at work last Tuesday) which may explain why I did something to a recipe, one that I've used many times before, ( and which follows at the end of this post) to make the results look like this:


    Now, I was actually baking these to take to a WI meeting, and no amount of frosting was going to hide the fact that the cakes had sunk completely.  I had little choice but to bake another batch, paying closer attention to the recipe.

    The second batch turned out fine - but what to do with all the sunken cakes?  They tasted fine, they just weren't very presentable....

    Trifle, maybe?

    The idea of making a vegan trifle had never occurred to me because trifle was never a dessert I felt comfortable with - possibly due to the the clash of textures created by eating cheaper versions of the dessert.  But I had almost twenty of these cupcakes so I had to do something.

    Did I mention that I had a cold?  Well, that's probably why I failed to get any custard powder.  Oops....

    Gotta improvise I guess ;-)

    Take one sad looking sunken cake.


    add two teaspoons of St Dalfour fruit preserve.


    add two dollops of plain 'Wot No Dairy' dessert from Redwood foods,


    and a sprinkling of chocolate chips.


    EAT!


    YUM!

    Now here's the recipe if you want to sink your own cupcakes!

    DRY INGREDIENTS

    One and a half cups of rice flour
    Three quarters of a cup of sugar
    One teaspoon of baking powder
    One teaspoon of bicarbinate of soda
    One teaspoon of ground flax seeds

    WET INGREDIENTS
    The juice of four average sized lemons
    One tablespoon of lemon zest
    Three quarters of a cup of flavourless oil (like sunflower)
    Half a cup of rice milk
    One teaspoon of orange essence.

    Pre heat the oven to 250 degrees/ gas mark 6

    Mix the dry ingredients first and create a well in the centre of the mix.

    Mix the wet ingredients.  The resulting mix will look as though it's separating, and your first instinct may be to try and whisk the ingredients to get them to blend.  But, really, don't worry about the whole oil and water thing - just pour the mixture into the well in the dry ingredients.

    At this point you may think your ears are deceiving you - they're not, the mixture is actually fizzing (this is caused by the citric acid in the lemons reacting with the bicarbinate of soda.)

    After the 'fizzing' the mixture is going to look a little weird, like it won't hold together, but keep calm and carry on until the cake mix is at 'dropping' consistency (a healthy spot between the texture of dough and the texture of a smoothie.) 

    Spoon the mixture into cupcake cases, or a lightly greased baking tray and bake for approximately 20 minutes.  trust your sense of smell when it comes to the baking time....

    NB They taste even better the day after baking :-)


    Friday, 19 August 2011

    More help for my buddy

    A good friend has designed a load of T-shirts to help in the effort of raising money for our mutual buddy who is currently battling cancer (see this post for more information).


    He is an absolutely brilliant artist, and the designs are fantastic, so you can treat yourself, or someone special, and contribute to a good cause at the same time!


    Visit the shop here.
    Copyright: S. Ward 2011

    Thursday, 18 August 2011

    Lazy Girl's Gathered Top

    Here's a quick and easy way to make a gathered, drawstring top from a man's t-shirt.


    You will need:
    One regular fit t-shirt that sits comfortably over your chest
    Sewing machine
    Thread in a matching or contrasting colour
    One safety pin


    We begin by cutting off the sleeves, 


    then cutting a straight line just under the neck.


    Hold the t-shirt up to you and decide where you want the bottom edge to sit.  Mark that area with tailor's chalk, or a pin.  Add two inches to the final length and trim the excess from the bottom.  Do not discard this piece as we'll need it later on in the project.


    We need to hem arm 'holes' to ensure they don't fray.


    Next we're going to create a channel at the top for the first drawstring.
    Fold the raw edges under by about one inch and pin into place.  Sew along the line, keeping as close to the raw edge as possible to ensure that the channel is large enough.  Repeat on the second raw edge and the top portion is complete.


    Decide which side you would like the drawstring on the bottom to be, and make a cut in the the side seam about an inch and a half long.


    Tuck the raw edge under and pin.  Sew along the line, making sure to keep the channel wide enough to pass the drawstring through.

    Here's where that discarded piece from the bottom of the t-shirt comes in.  Cut off the hemmed edge and set aside (for another project, perhaps...)  Take the remaining 'tube' and cut along one side seam to create one long piece.  Now cut along the length to make it into two long pieces.


    Now we are going to tug on those pieces to make them longer and thinner.  The material will shed a little at this stage, but don't worry - it won't disintegrate!


    When the pieces are fully stretched out, put a safety pin on one end of the first piece and thread it through the channel at the top, ensuring that there is an even amount showing at both openings.


    Now repeat at the bottom.  Tie the ends of both drawstrings with a knot to help prevent fraying and you are done!


    If you have a little more patience you can thread a bead onto each end of the drawstring for a bit more flair....

    And here's one I made for my sister...


    Thursday, 11 August 2011

    A Little Help...?


    I've recently discovered that a good friend has cancer and, in light of that, I've decided to dedicate the folksy store (linked on the right) to raising funds for him, for all the things that people forget about in times like these - for instance, the energy companies don't let you off your bills simply because you have a life threatening illness and have to take time off work for treatment...

    In addition, the store will have other crafters and artists donating their work, so there will be a lot more interesting stuff on there over the next few weeks.

    Go on, add a little philanthropy to your day :-)

    Friday, 5 August 2011

    Get tuft!

    This is a little tutorial for a simple patchwork cushion, which can either be left plain, or embellished with tufting.


    Things you'll need:
    Three fat quarters in contrasting colours.
    Needle and co-ordinating thread
    Sewing machine
    One cheap pillow (like this one from Ikea) or polyester filling

    The finished cushion measures approximately 17" by 14".

    We're going to begin by turning two of the fat quarters into smaller patchwork pieces.  Fold the fat quarter in half and cut along the fold (if you're not using a rotary cutter, and are worried about staying in a straight line, pin the open ends together to keep the material from slipping).  You should now have two pieces.  Fold each of the pieces in half, again, and cut a long the fold as before.  Repeat the process with the second fat quarter.  You should now have eight smaller pieces of fabric, plus one full sized fat quarter.  


    We will be using four of the eight smaller pieces so you can put the other four aside for another project, or patchwork the back of this project :-)

    Take two of the four pieces, ensuring that they are contrasted, place them right sides together and sew along one side, leaving a half inch seam allowance.  Open up the seam and iron flat.  Repeat the process with the other two pieces.  You should now have two long pieces :-)

    Sew the two long pieces together, making sure that each square is sitting next to a contrasting square; open up the seams and iron as before.  You now have the front of your cushion!


    Place the front of the cushion and the remaining fat quarter right sides together; you will notice that the fat quarter is now a bit larger than you'll need it.* Try to place the front, comfortably, in one of the corners of the remaining fat quarter.  When you are happy with how the two pieces are sitting, pin them together and trim the excess from the back piece.  


    Now sew the two pieces together remembering to leave a gap (about the size of your hand) for turning the cushion right side out.

    Once the the two pieces are sewn together snip the corners and, turn right side out.  Make sure to push out the corners (with the blunt end of a knitting needle, or something similar) because you won't have much leeway for altering the shape once the cushion has been stuffed.

    Talking of which, now is the time to pop open that pillow and get stuffing!  I used about a third of the Ikea pillow for this one.


    Once you have the cushion as full as you want it, use the contrasting thread to hand sew the gap shut.


    Your cushion is technically finished (yay!), and you can leave it as it is if you wish.


    However, if you would like a little bit of embellishment, you could add a single 'tuft'.

    In all honesty, tufting can be a pain in the butt, but, it does look fantastic once it's done!

    I decided to add uncovered buttons to my project, but covered buttons or pom-poms  also make fantastic embellishments.

    Tufting is very simple in theory, but can be quite fiddly in practice.  Basically, you sew an embellishment through one side of the cushion right through to the embellishment on the other side, thus pulling the front and back together and creating a little dip on each side.  Mark where you wish each embellishment to sit, with dressmaker's chalk or pencil, so that you're not having to 'guess' if the needle is arriving in the right spot.

    When using buttons it's easier if the first button is secured with a couple of stitches so that you don't have to worry about holding it in place whilst pushing the needle through to the other side.

    Once you feel as though both buttons (or pom-poms) are properly attached, secure the thread and trim off any excess.

    And you are done!


    Happy tufting!

    *If you've patch-worked the back of this project your two pieces should be the same size.