Wednesday 28 December 2011

Easy Fleecy Snood

This is a really easy snood/cowl to make, and so perfect for when the temperature drops in February (as it always does in the UK!)

All you need are two rectangles of material that are long enough to fit, comfortably, around your neck twice (I think my rectangles were about 55 inches long) and some matching thread.

I used fleece for one side and crushed velvet for the other, as I had copious amounts of both hanging around the house....

We're not going to use a pattern for this one; instead we're going to mark the rectangle directly onto the fabric.  I used the fleece first simply because it's easier to control than the velvet.


Once we've cut out our first rectangle we can pin it to our other fabric and cut around that.

I used the weights to keep the both fabrics stable


Now we're ready to sew the two pieces together.  Place the pieces right sides together  and pin, leaving about 3 and a half inch gap for turning. Sew, sew, sew...


Trim the corners and turn the scarf right side out through the gap left between the two pieces of fabric.


Now we need to do a 'little bit' of hand sewing.


We need to close up the gap and sew the two ends together at the same time - I found the best, and neatest, method was to use whip stitch.


When both ends of the scarf are secured together, you are finished!


Thursday 17 November 2011

Pencil it in!

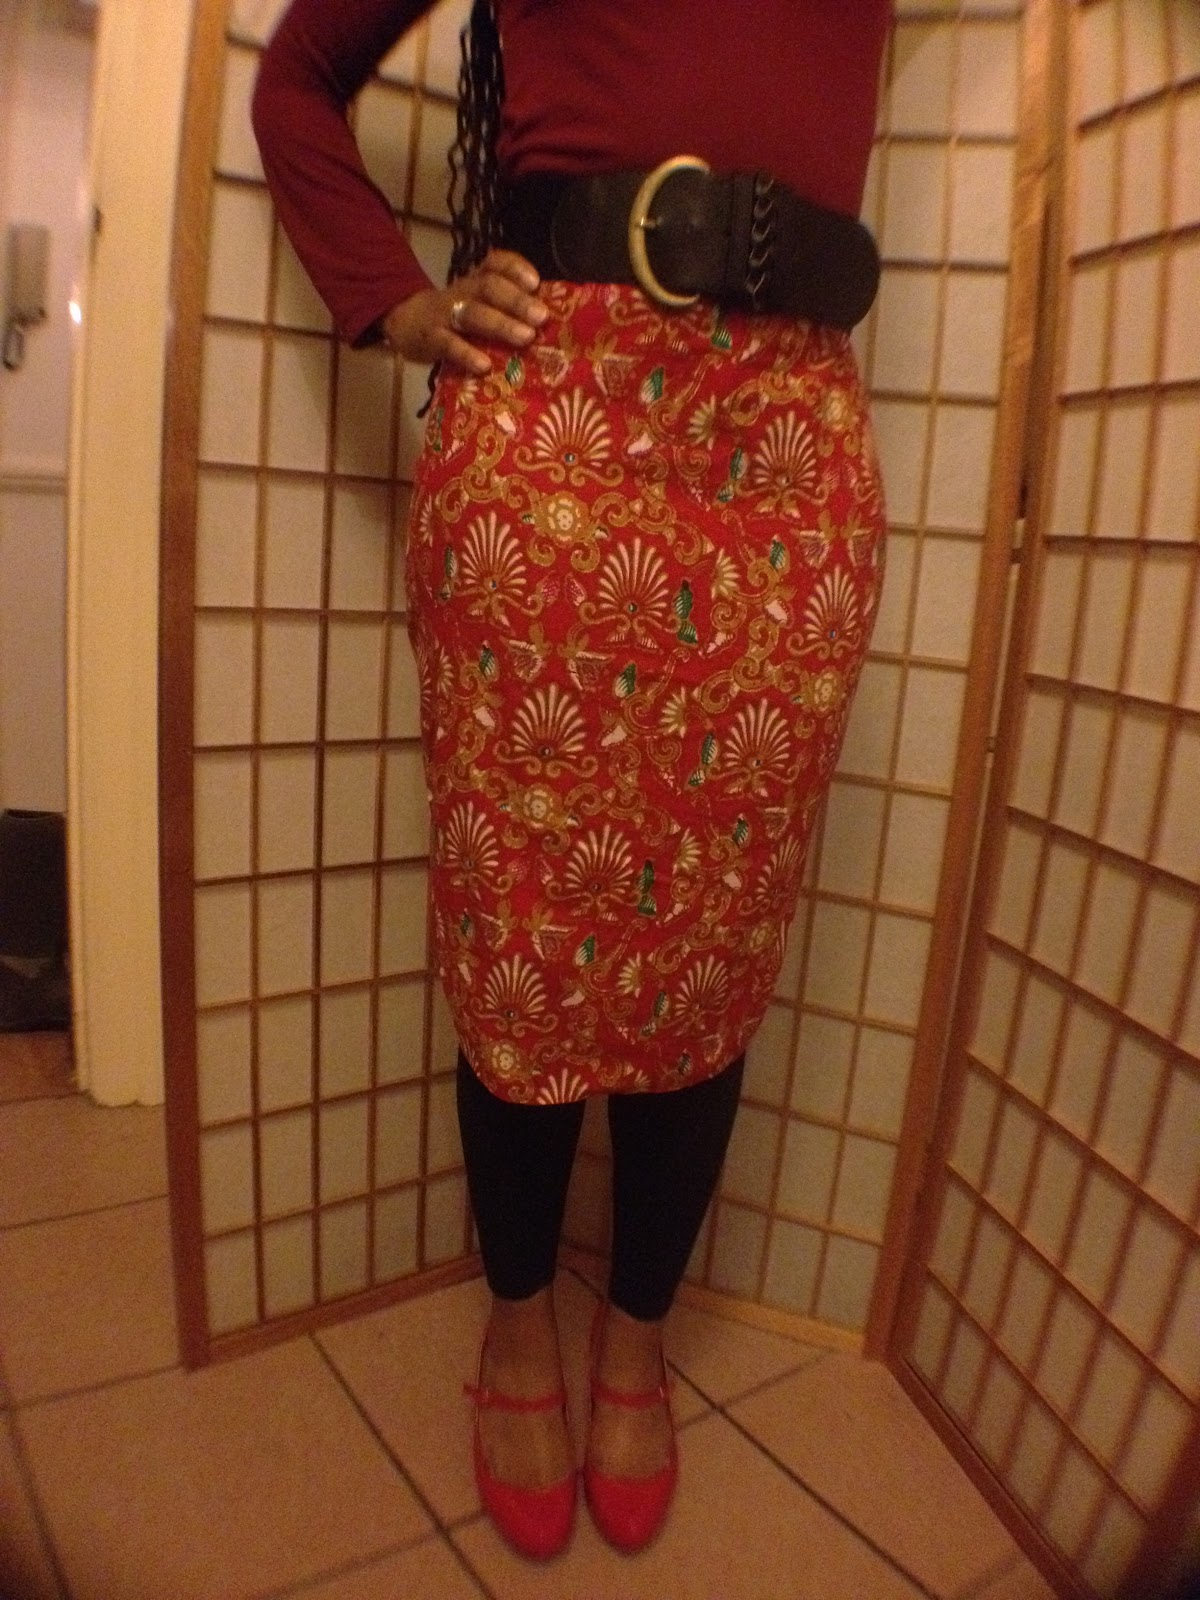
This is my take on how to make a 1950's pencil skirt....


The truly amazing Imelda May

When my sister told me that she'd booked tickets for us to see Imelda May  (love her!) next spring, I realised that there was no way that I could rock up to the gig in a boring old jeans and T- Shirt combo - so I decided to attempt to make my own 50's wiggle skirt.

This project is slightly more complex than my other projects, but it is still quite an easy one (once you get past all the mathematics...)

And this is how I did it....

These are the supplies you will need:
Pattern paper/parcel paper/newspaper
Tape measure
Dressmaker's chalk
Material
1 zip - approximately 6 inches long 

We're going to create a single pattern piece that we will use to create three pieces of material, and we start by taking five separate measurements.  We need the measurement for the high waist (about two inches below the rib cage), the low waist ( just above the hip bone), the hips, the length between the high waist and low waist and the length between the high waist and the hips.  We also need to decide how long we want the skirt to be, which is a case of  personal choice - I like mine to be below the knee, but if you want yours to be higher it would be a good idea to measure the circumference of the area where you want the skirt to stop.

Quarter each of those measurements, apart from the last one between the high and low waist,  then add one and a half  inches seam allowance - this is going to sound excessive at this point, but there is a reason for it.

Now, we need to transfer those measurements to the pattern paper (or newspaper/parcel paper)


We're going to place four marks on the paper.  The first will be the final measurement from the high waist.  Now we need to measure down from that mark the length of the measurement from the high waist to the hips and place a temporary mark there.  We then need to add a mark from the straight edge of the paper that fits the measurement of the width of the hips, going across the temporary mark. The final mark will be the one that marks the bottom hem.  If you have a an 'above the knee' measurement, mark this point at the desired length.

We are now going to draw, freehand, the pattern shape.  You should end up with something looking like this:


And as for that massive seam allowance.... measure one inch in from the straight edge of the pattern, and draw a line from the top to the bottom of the pattern (you can make this a broken line or draw it in a different colour, if you'd prefer.)  The front of the skirt will be cut from one piece by placing the pattern on the fold, but the back will be cut from two pieces, hence the extra seam allowance.


We are now ready to cut our fabric pieces.  As this is going to be quite a tight fitting skirt we need to make sure that the width of the skirt matches with the weft of the material, so that there is still room for maneuverability.

Fold the extra inch of pattern under, pin to the folded fabric and cut out.  If you're worried about forgetting which way the pieces should be, add a pin to the top.


Cutting the back is slightly more complicated if you have printed fabric, like the one I'm using.  In order to ensure that the pattern is flowing in the same direction on the entire skirt it is imperative that one piece of the back is cut from the right side of the fabric and one is cut from the wrong side.  If this isn't done, you will end up trying to fit an upside down panel, which will lead to the skirt looking misshapen.

When you have all three pieces ready, pin them together at the side, right sides facing.

Now, pretty much every woman will need to add darting to get the skirt to fit well around the waist: this bit can be a bit awkward if you don't have a dressmaker's bodyform (which I don't!) - but you can still work out your darts with careful pinning and some chalk.

Wrap the unfinished skirt around you where you want it to sit, with the open seam at the back.  Pull the excess material to the required tightness and, carefully, pin it closed.  Now take your dressmaker's pencil/chalk and make a mark on either side of the pin.  Un-pin the skirt and measure the distance between the chalk mark and the edge of the material.  Take away half an inch for seam allowance, and divide that number by two.  This final figure is how wide your darts need to be.  The length of the dart will be the measurement from your high waist to your low waist.

To make sure that the darts will sit in the right place, measure each of the back panels and place a mark in the centre.  Divide your dart measurement in half and place the halfway point at the mark you just made.  Now place marks at the beginning and end of your dart measurement.  Now measure from the centre mark the length of the high waist/low waist measurement and place another mark at this point.

To sew the darts we need to bring the two marked points together, with the material protruding on the wrong side (inside) of the skirt.  We now need to pin towards our final mark: you will notice that the line between the points is diagonal - this is precisely what we want.  Sew along this diagonal line.


To prevent puckering of the material on the outside of the skirt, we need to sew the dart flat on the inside.  Trim off the excess material once the dart is sewn flat.


Now we are ready for the zip!

We will be creating a double hem at the top so we need to place the excess on the top of the zipper about an inch below the raw edge.  Place a mark/pin at the top and the bottom of the zip.  When we sew the back seam we will be using a basting stitch between these two marks/pins. (There is a brilliant short tutorial on zippers here if my instructions seem a little vague - the instructions start at around 3 mins.) Remember that you will need enough seem allowance for the zipper tape to latch onto.


It's time to sew up the back.  Decide how high you want your split to be (and you will need a split unless you want to shuffle around like Morticia Addams!)  Now, starting from your first mark/pin use the longest stitch available on your machine to baste the area where the zip will sit.  When you reach the bottom mark/pin switch to your regular stitch, remembering to lock the stitches at the point of change.  End the stitching where the split will begin.

Press the new seam open and pin the zipper into place.

You don't have to be this generous with the seam allowance!


WAIT!  Time to switch to one of these!  

"I came free with your machine!"

(NB the bulk of the zipper foot should sit furthest away from the zipper teeth....)


When we reach the bottom of the zip we're going to change direction, sew across the bottom of the tape and back up the other side.  Go slowly across the bottom (use the crank handle if necessary) to ensure the needle isn't under too much stress.

Once the zip is in we need to unpick the basting stitches.  A seam ripper or embroidery scissors should do the trick.


RELAX!  The hardest part is over and we're nearly done!!!

All that's left to do now is the hemming (oh, how I wish I had an overlocker....)  I usually start with the waist because it's the longest.  We need to ensure that each edge is folded under twice to minimize the risk of fraying.  And remember to switch back to the regular foot on the sewing machine!


Next we'll sew up the sides of the split, using the same technique, and finally finish with the bottom hem.


Add one slim fitting t-shirt and a waist cinching belt and you're ready to cause some mayhem!


Tuesday 15 November 2011

At the root of it

I bought some parsnips on a whim and had them languishing in the fridge for a week (whilst constantly telling myself that I was going to cook them really soon!)
Well, a few more days passed and they were still sitting there, so I wondered if this was the time to attempt making a root vegetable cake.

We hear about carrot cakes all the time, but parsnips are so much sweeter, naturally, that it seems as though parsnip cake should be the popular choice, with people only choosing carrots when the parsnips are out of season... Or something....

Anyway, here's how it's made ;-)

You will need:

2 large parsnips
1 1/2 cups of rice flour
1/2  cup of sugar
1 1/2 tsp baking powder
1/2 tsp baking soda
1 tsp cinnamon 
3/4 cup flavourless oil
1/2 cup rice milk (or soy, if you prefer)
1 1/2 tsp vanilla essence
1/2 tsp orange essence 
1 tablespoon of agave nectar (optional)
A handful of raisins (optional)

Preheat the oven to 220 degrees.
Peel the parsnips.
Mix all the dry ingredients together.
Grate the peeled parsnips directly into the dry ingredients (this takes some serious elbow grease - work those biceps!)
Add the raisins if you wish and mix so that the fruit and veg are spread evenly throughout the mixture.
Add the oil and the rice milk and mix thoroughly. The mixture will look a bit lumpy, but should still be at a cake mix consistency - don't be tempted to add more liquid to make it smooth.
Spoon the mixture into a greased, sprung cake tin and place in the bottom of the oven. 
Cook for 35 - 40 minutes.
(if your oven is a bit more compact, and you're worried about the top burning, place a piece of foil over the tin and cook for twenty minutes - remove the foil and continue to cook for the remainder of the time.)

It really is delicious!

Sunday 23 October 2011

Purses!

In typical 'me' fashion I decided to learn a new craft the day before I needed present couple of thank-you gifts.  However, they both went down well, and I now have a new project to take up what little spare time I have left :-)

I used this handy little tutorial as my basis with some frames purchased from museum collection.

They looked so cute until I tried, in my heavy handed and rather clumsy fashion, to glue one of  the finished purses into the frame.

I was pretty close to just running to the high street to find  'store bought' replacements, but with a litlte care (and acetone free nail polish remover) I got the (relative) success I was looking for...

They look like change purses, but they are actually clutch size :-)
But, seeing as I am less than graceful with a tube of Uhu, I think I may attempt the hammering technique in the future...

Friday 7 October 2011

The Knitting & Stitching Show 2011

If you live any where in or close to London, and you love to craft, then you need - and I mean NEED - to get yourself to the Knitting and Stitching Show at Alexandra Palace this weekend.  This show has everything from knitting stations to a stall selling handmade chocolate (yes, I said handmade chocolates!)
(Too delicious!)

If you feel as though you've hit a wall in relation to what projects to work on next, this is definitely the place to go to gain a wealth of inspiration - my head was absolutely buzzing with ideas within minutes of my arrival.  I've always been more of a crochet gal than a knitter, but this show has really given me the knitting bug!  And I can absolutely guarantee that no-one can spend any time at this show without feeling the need to quilt something - blanket, wall hanging, cushion; decisions, decisions.... (Actually our local WI has a quilting workshop planned for the next meeting - roll on October 27th!)

Speaking of quilting, the Festival oF Quilts competition winners (stand G15) is an absolute must for anyone with even a passing interest in textile or visual art.  The quality of the artistry is truly beyond stunning.  The interesting thing to note (and this may be a trait confined to my own peculiar psyche) is that textile art, unlike many other visual arts,  has an effect of spurring on the creative urge: so, even when a piece is far beyond the reach of the viewer's ability, there remains that desire to attempt to reach that standard, and enjoy whatever progress can be made along the way.
Knit1 Hook1 - Pass it on

And that feeling of diving in to projects without external judgement really does characterize the atmosphere of this show: the feeling is that everybody should be comfortable whilst finding their own creative voice - which creates such a pleasant atmosphere that it's easy to feel as though this part of London has been transported to a place and time where daily 'competition' did not hold sway.

There are also workshops galore until 3.30 pm each day with a repertoire that ranges from the basics of utilizing a sewing machine to bead-weaving master-classes.  Be sure to check at the information desk as these classes are very popular and can sell out rather quickly.
The ULTIMATE embroidery machine

If up-cycling is more your thing then why not bring along a piece of clothing, or two, to the Upcycling Academy to learn how to refashion items that may have been languishing at the back of the wardrobe, rather than simply purchasing something new from a high street chain store.  Twisted Thread have teamed up with Traid to ensure that people have a full understanding of the journey our high street clothes make before being sold at, often, 'knock down' prices in in conglomerate stores.
(Make do and mend)

But, if you are just looking for some fabulous bargains, there's all that too!  There is so much in the way of yarn, material, thread, embroidery floss, beads, and buttons: and that is alongside all the amazing sewing machines (Janome, how I yearn for thee), crafting supplies and bespoke artwork. I really had to reign in my desires in order to ensure that I didn't spend half my salary on 'gorgeous things'!   (I did, however, indulge in some lovely fabric, which will be turned into a skirt, or two, in the very near future: watch this space...)
Wool Fish


Want!

But there is even more!  In the general foyer there are more stalls and exhibits (be sure to check out the circuit board!) and please take the time to view the Battle Of  Prestonpans Tapestry which is displayed along the corridor that leads to the main hall.  


There are also books and patterns galore - some of which are rare or antiquated, and Sew Today (stand H44) have out of print patterns from giants such as Vogue and McCall at discounted prices.

The show runs until Sunday the 9th of October and is an absolutely fabulous day out for all crafters and artisans!

P.S.  If getting to London really is an impossibility, there are two more shows coming up before the end of the year - one in Dublin from the 10th to the 13th of November, and one in Harrogate from the 24th to the 27th of November: check the Twisted Thread website for more details.

Saturday 24 September 2011

A pleasant surprise...

A couple of lovely souls have purchased items to help out my friend, so I went to the Folksy site this morning to double check that I was sending out the right items.


Imagine my surprise when I found one of my items on the front page!


Get in!

Tuesday 13 September 2011

Easy Peasy Beret

This is a really easy hat project; I think it actually takes longer to cut the pattern than it does to make the hat :-)


If you have an old pair of trousers languishing at the back of the wardrobe, why not use the material to make a simple beret.  Suit  material, like tweed, works especially well, without the need for a lining.

Things you'll need:

Old pair of trousers
Matching or contrasting thread
One button

The pattern I've supplied is quite large (I have a lot of hair!) but you can trim it to size if you need to - but make sure that you trim, evenly, all around the pattern and not just the bottom :-)  Each square on the pattern grid should measure 5 mm.

If you're unsure about the size you want, measure right around your head from your forehead to the base of your skull and back; add an inch for seam allowance and then divide by six.  The number you are left with should be the measurement of the base of the pattern.

You'll need to cut six panels from your chosen fabric.


Now, take the first two panels, pin them right sides together and sew, using about an eighth of an inch seam allowance - stopping just before you reach the tip of the panel.


Continue with the other panels until all six panels are attached.

Now we can close the hat up by sewing the last two open sides together, and sewing across the middle point to close up the top.


We can now add the hat band.
(When I first made this project I just assumed all of my initial measurements were correct and didn't bother to double check - needless to say, my band was about two and a half inches too short; so it's best to check the circumference before cutting your material and remember to add about half an inch seam allowance.)

Once you have the correct length you will need to make the band about two inches wide.

We're going to work with the right sides together, so we need to match the raw edges with one another.  There should be a little extra material left over where the two ends of the hat band meet; this needs to sit on one of the seams of the main hat. Pin and sew around the band.

(Remember to use free arm sewing)


Sew a straight seam along the width of the band where the two ends meet.  Trim off any excess.

We can now finish of the main body of the hat!

Turn the hat inside out and and fold the hatband under and pin, leaving enough band showing for it to become a decorative feature.  Sew the band down.  (If you are using quite a heavy fabric, like denim, you may want to press the band before sewing.)


Almost there!

All we need to do now is cover a button, to place in the centre of the hat.  Covering buttons is not a forte of mine, so I don't have much to offer in the way of instruction!  I simply try to gather together as much of the fabric behind the button as possible, and keep sewing until the material seems both taut and secure.

Like this... I think...


Now we can add the button to the hat and voila! Your hat is complete!

really bad lighting, sorry...


Here's another one I made with some simple decorations, made from t-shirt scraps.


Give it a go!